I have been a gardener my whole life and Lisa and I have now established eight large raised-bed gardens behind our home in Fort Collins. My mother and sister were florists, my dad ran a lawn mower business and my grandparents were farmers. Growing things has always given me a source of renewal and connection to the earth that I would miss if I didn’t have a place to grow things. But what if you live in an apartment with only a small patio, or a townhouse with a tiny backyard?

Will Allen, a former NBA star, has become even more famous for urban gardening. He teaches young people how to grow food, raise fish and be productive in agriculture in a warehouse or on a rooftop in Milwaukee. His Growing Power program has won recognition with a 2005 Ford Foundation Leadership Grant and a 2008 MacArthur Foundation Genius Grant. I have admired his work and thought about the empowerment that this kind of program has in bringing urban young people into science and agriculture.
Lisa and I were recently in Hawaii and saw a small scale Tower Garden at a farmer’s market, growing beautiful lettuce and spinach vertically in a very small space. I had to try it, but wanted a way to do it without spending over $500 for the tower and shipping costs. So as we started our garden this spring, I built a lettuce tower, a vertical garden, a hydroponics mini-farm for about $180. I made it from a variety of materials I already had or that could be bought inexpensively from local sources. Most of the expense involved is a one-time set-up cost, so the more greens you grow, the more you will eventually save over time. But saving money on fresh greens is only one benefit – growing your own food allows you to control what goes on your table and in your body. It’s the only way to guarantee freshness and pesticide-free food available all year long just a few feet from your kitchen.
I call it the Lettuce Tower, though you can grow a great many herbs, strawberries, spinach, kale and other greens on one of these units. Here’s the idea.
Gather these materials (you may find other items you have on hand that substitute for any of these equally well):
4×4 foot piece of 2X4 inch welded wire (plastic coated preferably) – about $5
4X4 foot by 1-inch coco mat (CocoTek) – $45
4X4 foot piece of black plastic painter’s dropcloth – $5
16 gallon or larger galvanized or rubber wash tub or horse trough at least 18 inches in diameter – $21
2 to 4 bricks – about $2
4 foot – ½ inch plastic nipple with a Rainbird or similar 15H nozzle on top of it – $4
roll of 12-gauge plastic coated electrical wire (you may or may not need this – see below)
Two 15” cocomat lined wire hanging baskets $6 ea. (I found these at a number of gardening and grocery stores – anyplace that sells bedding plants)
Submersible pump – 350 gallon per hour (GPH) pump – $27 at Amazon
Pondmaster square foam filter for the pump – $10
Plastic self-locking ties – $3
Canna Coco A & B and Botanicare’s Cal-Mag – liquid fertilizers for hydroponics – mail order or your local hydroponics store – about $42

Plastic tray with lid and Rapid Rooter Plant Plugs – $13
Place the welded wire on the ground, the plastic dropcloth on top of that and the cocotek mat on top of that. Curl the entire thing into a cylinder and use plastic self-locking ties to hold it in a cylindrical form.
Set your washtub where you want your lettuce tower. We have ours outside in full sun (with access to an outdoor electrical outlet) but we will move it inside to a sunroom with southern exposure in the winter.
Place the submersible pump in the bottom of the washtub with a Pondmaster foam filter block around it to keep out small particulate matter. Set a concrete block or bricks on each side of the pump to steady it and provide a base for the tower. Screw the 4-foot nipple with the spray nozzle on top into the pump so it stands upright (my pump has suction cups on the bottom that stick it where you put it but the pipe sways and that’s a problem. I’ll explain next.)
Put the cylinder of cocomat, plastic and wire over the vertical nipple (pipe) so it is resting on the bricks just at the water line with the pump beneath it. Insert a piece of 12-gauge plastic coated electrical wire through the side of the middle of the cylinder, reach in and wrap it around the ½ inch pipe and then push it through the mat on the other side. I adjusted it so the pipe sits in the very center of the cylinder. This controls the sway of this spray nozzle to keep it centered.
Fill the tub with water to just cover the base of the cylinder and add Cal-Mag according to instructions on the back. This provides essential magnesium, calcium and iron. Then I add the amount of A & B Coco Canna liquid fertilizer the package recommends. Never mix the concentrates directly together. Plug in the pump and look inside the cylinder. It should create an even ring of spray in the top of the cylinder but will overspray a bit out the top so you’ll need to create a cap.
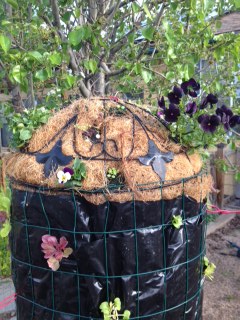
To make the cap, take the two 15-inch hanging cocomat baskets and remove the hanging chains provided to suspend them. Place both cocomats in one of the baskets, place the other basket over the cocomat to create a sandwich – wire basket, cocomat, wire basket. Wire the two baskets together so that you have an inch thick cap for the cylinder of 15 inches diameter with the wire frames holding the mat in place. Hinge it to one side of the cylinder with another small piece of plastic coated electrical wire. Now the cap causes the water to rain downward through the cylinder. You can look inside when you wish by lifting one side of the cap to see if the spray is working correctly and see the root growth.
We are growing seedlings of lettuce, spinach, strawberries, cilantro by placing seeds in little Rapid Rooter Starter plugs in a plastic tray. About ¼ inch of water in the bottom of the tray keeps them moist but add water daily. These are best grown in a warm, sunny place in your house. A small commercial warming mat speeds up germination if you wish to add that cost. Grow the new seedlings for about a week after they first show leaves.
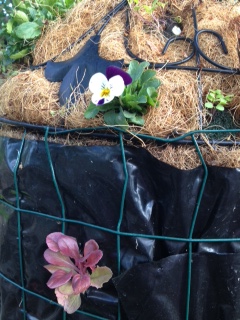
When your seedlings are ready to move to the tower, gather three or four of the seedlings out of the germination tray, still in their starter plugs. Use a small knife (I use one of our steak knives, but don’t tell Lisa) to cut an inch slit in the plastic on the cylinder, reach in with two fingers and spread the cocomat until you feel the dripping water. Push one of the one week-old plant plugs into the hole so that the green leaves are hanging out fully visible on the outside of the tower. Add a few of these plugs each day to stagger the harvest dates of the lettuce crop. Keep them 8 to 10 inches apart. I want to harvest a bunch of greens every two or three days when they are big enough.
I’ve been amazed that the tiny seedlings show 3 inches of lush growth within ten days of planting, growing much faster than the same plants in soil in our gardens. As your plants mature, you can harvest greens by pulling the entire plant out and cutting the roots off. We bought lettuce grown in this manner in Hawaii and it was very tasty. Strawberries can be harvested right off the tower and should keep producing.
I confess that I am not very mechanical but I love playing with ponds and aquariums. This was similar so I enjoyed the hour and a half of assembly. It took no particular skill to build it since the four-foot cocomat (3/4 or 1 inch thick) is just the right size for this project.
We live in a world of challenges to feed people, educate young people about science and to design more sustainable approaches to everything we use in life from energy to water to food and air. These projects are great ways to engage young people in a school, at a nature center, in a museum or at a demonstration farm in growing food in creative ways that recognize the limitations of space, soil and outdoor resources.
Will Allen has aptly demonstrated the power of this programming in Milwaukee and his daughter operates a Growing Power program in Chicago. Dylan Ratigan, a well-known journalist, was just featured on The DailyShow for developing hydroponics farms to employ returning veterans from Iraq and Afghanistan.
As I watch the lettuce tower each day, I experiment with the process. I am growing johnny jump-ups and allysum on the cap of the cylinder, just for the look of it. I find the jump-ups growing as volunteers in our yard and transplant them. They adapt to the soil-less environment immediately and grow well.
I am working on a video to post on YouTube that explains and demonstrates this particular process. If you want to try it, be creative with it and try using things you have already around your house (we had the horse trough, electrical wire, and aquarium pump all sitting in the barn from previous projects). Let me know what works and I will share it with our readers. Involve young people in your project, your students or your children or kids from your neighborhood. Be sure that enjoying the food in a meal is part of the process. That helps make the connection for kids who have grown up with a supermarket as the source of everything. It’s empowering to learn they can grow their own food at home. And it’s just plain fun.
– Tim Merriman
